Turn a cardboard box into a solar oven and harness the sun’s energy to make your own s’mores—our favorite summer treat! Learn about energy, cause and effect and enjoy a sweet reward, too!
What is a solar oven? A container that traps energy from the sun to heat up the air inside the container. It works much like a greenhouse, but all you need to make one is a cardboard box, aluminum foil, plastic wrap and a glue stick.
This activity is featured in our July Activity Calendar. Don't yet have your free copy? Get it here!
The Guide
Step 1: Check the weather.
A solar oven works like a charm, as long as you have a sunny day with outdoor temperatures at or above 85 degrees Fahrenheit (~29-30 Celsius).
Step 2: Gather your materials.
You’ll need:
Cardboard box (at least 3-4 inches deep)
Aluminum foil
Clear plastic wrap
Glue stick
Tape of any kind
Stick, metal skewer or ruler (about 1 foot long)
Box cutter or knife to cut cardboard (adults only!)
Step 3: Set up your solar oven.
Seal the box up (if it doesn’t seal up or stay closed on its own).
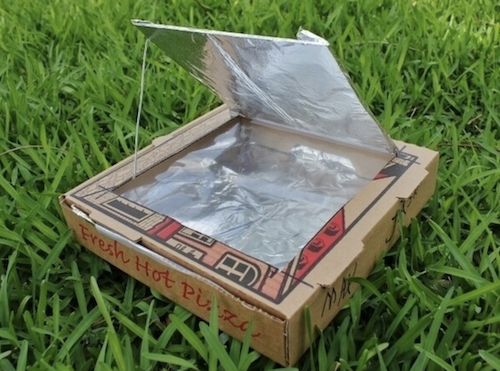
Cut a 3-sided flap out of the top. As you cut, leave at least a 1-inch border around the three sides. (See photos for an example of where to cut).
Cover the inside of the flap with aluminum foil, using glue to make sure it sticks. Be mindful to smooth out the foil as much as you can.
Line the inside of the box with aluminum foil in the same way (attaching with glue and smoothing). You can place black paper on the bottom, but you can also just use tinfoil.
Stretch plastic wrap across the opening you cut to create the lid and tape it in place. Note: If you, like us, are trying not to use plastic, you can try to use a piece of glass. We’ve tried to use a glass baking dish and use tape to form a seal around it. The reason plastic works so well is that it allows the sun through and traps the heat in.
Get your stick or ruler and set it up so that the stick props the oven lid open, allowing the light to reflect back into the box. Use tape if you need to secure the stick in place.
Note: As you set up your oven, welcome kids to be involved in whatever way feels right and to whatever extent they are interested. It can be fun and useful for kids just to play and explore some of the materials along side you (e.g. sculpt with tinfoil or see how tinfoil feels in the sun), too.
Step 4: Preheat your oven.
Place the oven in direct sunlight on. Prop the flap open to reflect the light into the box. You will probably have to tape the prop in place. Preheat the oven for at least 30 minutes before you add your s’mores.
Step 5: Gather s’mores ingredients.
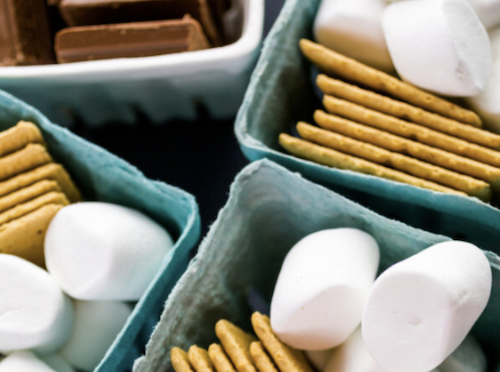
You will need:
Graham crackers
Marshmallows
Thin chocolate bars
Break graham crackers in half and place a marshmallow on each one. Note: We like to use thin chocolate and put it on at the end, since chocolate melts so much faster than marshmallows in the solar oven.
Step 6: Start cooking!
Gently peel back your plastic or clear covering. Place your graham cracker/marshmallows in the preheated solar oven. Close the plastic/clear oven lid again and make sure it’s on tight. Then, use your stick once again to prop up the flap and reflect the sunlight into the box.
Step 7: Practice patience...or just go play!
Depending on the heat of the day and how bright the sunlight, it takes between 30 to 60 minutes for marshmallows to reach s’more level smoosh in the solar oven.
One you think they are ready, carefully peel open the clear oven lid and add a piece of chocolate on top of each marshmallow. Place another graham cracker square on top to complete the s’more.
Put the plastic cover back on and seal tight once more. Let the whole s’mores heat for just a few minutes more to melt the chocolate a bit, too.
Step 8: Enjoy!
Enjoy your sun s’mores and the satisfaction you feel when you make them all by yourself—even without a campfire!
Optional: Add some wonder and experiment a little. If you have an extra box and the time, make a second solar oven, but leave out some of the key ingredients like the tin foil or the plastic/clear lid. Set them side by side and put just one test cracker and marshmallow in the extra experimental oven. Notice how different the results are from your main solar oven and your experimental “oven.” You can also brainstorm ways to make your solar oven even more powerful. For example, could you use a mirror instead of tinfoil? Or place the oven in an even sunnier place or on an even sunnier day?
Why is this activity great for kids?
We can't think of a sweeter way to learn about energy and the powerful impact of our sun than making s'mores in a solar oven. Whether you choose to experiment or not, building your own oven from household materials helps kids discover things about about the properties of different types of matter and how energy travels and impacts materials. Sun s'mores take time, and this activity helps kids learn that good things come when we wait just a bit, too. We make sun s'mores every year, and we love seeing how our kids go deeper and discover new things each time we try—and we always savor our hard earned s'mores!
Curiosity means the ability and habit to apply a sense of wonder and a desire to learn more. Curious people try new things, ask questions, search for answers, relish new information, and make connections, all while actively experiencing and making sense of the world. To us, curiosity is a child’s ticket to engaging fully in learning and, ultimately, in life.
Why does it matter?
As a parent, this skill is, perhaps, the easiest to grasp and has the clearest connection to a young children’s learning. We all want my children to wonder, explore and drive their own learning and, better yet, to experience the world fully. Most teachers would agree that the curious children so often seem more attentive, involved and naturally get the most out of time in school. Even the research suggests that being curious is a driver of higher performance throughout one's life, as much if not more than IQ or test scores.
Sensory
Category:
Body Skills
What is Sensory Development?
Although some scientists classify as many as 20 senses, when childhood educators talk about "developing the senses," we typically mean developing the five standard senses: sight, hearing, touch, smell and taste. In addition to honing these senses, educators care about sensory integration, which is the ability to take in, sort out, process and make use of information gathered from the world around us via the senses.
Why does it matter?
The better kids are able to tune and integrate their senses, the more they can learn. First, if their senses are sharper, the information kids can gather should be of greater quantity and quality, making their understanding of the world more sophisticated. Further, until the lower levels of the brain can efficiently and accurately sort out information gathered through the senses, the higher levels cannot begin to develop thinking and organization skills kids need to succeed. Senses also have a powerful connection to memory. Children (and adults) often retain new learning when the senses are an active part of the learning.
So, if kids have more sensory experiences, they will learn more, retain better and be better able to think at a higher level. Makes the days they get all wet and dirty in the sandbox seem better, doesn't it?